|
Editing
RealMedia with the RealMedia Editor
by Jason Crowder
12/16/02
 |
Click
to enlarge |
We often tell our clients that
RealMedia
is a “non-editable” format. By this
we mean that you cannot use a standard Non-Linear
Editing System (NLE), such as Adobe
Premiere, to make video editing changes to
a file in RealMedia format. There is a way, however,
to make simple “cuts only” video edits
to these files. This magic is done using the RealMedia
Editor, an application that ships with “Producer
Plus” line of products from RealNetworks.
Using the RealMedia Editor,
you can easily change “clip information”
embedded in the file such as the Title, Author,
and Copyright, as well as chop the video into
smaller segments. Using a little creativity, you
can even stitch multiple RealMedia files together
to make a larger video segment. All of these issues
will be discussed in this tutorial.
Changing Clip Information
There are times I forget to
add the correct clip information when encoding
a RealMedia file. This occurs most of the time
because I do not change the Clip Info fields in
the encoding software and just use the values
that the last person used before me. You can easily
remedy this by following these steps:
- Open the source RealMedia
file in the RealMedia Editor . TIP:
You can quickly open files in the RealMedia
Editor by dragging and dropping them into the
window.
- Modify the Clip Info fields
on the main screen or clip the “Clip Info…”
button for more options.
- Save the file. Note: For
larger files, the saving process can take a
long time.
Chopping and Trimming--
a RealMedia “Haircut”
Editing with the RealMedia Editor
pretty much amounts to giving the RealMedia file
a haircut. But as with a real haircut, the more
you know about the practice, the prettier the
end result. Okay, enough with the metaphor!
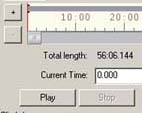
It is easy enough to choose
the “In” and “Out” points
for trimming or chopping. The RealMedia Editor
provides a timeline control as well as buttons
for selecting the In and Out points. Once you
have selected the segment you want to save, you
need to make sure the In Point you have selected
is on a keyframe. Keyframes are used to reset
a video image during encoding. All other frames
are created for minor adjustments between the
keyframes. If your In Point is not on a keyframe,
your final RealMedia output file will playback
with black video until it reaches a keyframe.
This is why is it so important to make sure your
first frame in your new RealMedia file is a keyframe.
Follow these steps to Chop or
Trim a RealMedia file:
- Open the source RealMedia
file in the RealMedia Editor
- Navigate to the location
in the video where you want to set your In Point.
You can do this by dragging the timeline control
handle or by simply playing the video. Stop
the video when you have found the appropriate
location.
- Navigate to the Previous
Keyframe in the video by clicking the “<<”
button. This will ensure that the location you
have chosen as your In Point will be included
in the actual starting point of the new file.
Alternatively, you could have selected the “>>”
button to navigate to the next keyframe instead
if the location of the next keyframe is an acceptable
starting point.
- Set the In Point by clicking
the “In” button (there are keyboard
short-cuts and menu options for this as well).
- Set the Out Point in your
video by navigating to the appropriate location
in the video and then clicking the “Out”
button. It is not necessary to end your video
with a keyframe unless you plan to append two
video segments together.
- Enter the appropriate information
in the Clip Info fields.
- Save the file. Because you
may not like the newly created RealMedia file,
you should save your file with a different filename
to prevent overwriting the original source file.
After playing around with the
keyframe buttons you will soon discover that you
sometimes just have to compromise on the location
of your In Point. If your video has lots of motion
in it, chances are that you be able to find a
keyframe relatively near where you want your video
to begin. If you have talking head video with
little overall motion, for example, there tends
to be less keyframes. TIP: If you enable
"Loss Protection" in the preferences
section of the "Producer Plus" application,
more keyframes than usual will be added during
the encoding process which may give you more of
an advantage when you edit the RealMedia file
later.
Stitching Multiple RealMedia Files Together
The RealMedia Editor does not
provide a means for selecting multiple In and
Out points. Therefore, if you want to “cut
out” a section of the video in the middle
of a RealMedia file, you must create a new “first”
piece of video and a new “second”
piece of video and then append the pieces together.
Create your two video segments
by following the steps above for each piece. Be
sure to save each video segment with a different
filename and do not overwrite the original source
file because you may want to go back later and
make changes if you do not like the final output.
Be sure that whatever piece you designate as the
“first” piece ends with a keyframe.
This will ensure that the two video segments come
together nicely.
Follow these steps to append
two RealMedia files together:
- Open the first RealMedia
file in the RealMedia Editor.
- Select the “Append
RealMedia File…” menu option from
the File Menu.
- Browse for the second RealMedia
file. Remember, the second RealMedia file will
be appended to the end of the first RealMedia
file.
- Enter the appropriate information
in the Clip Info fields.
- Save the file. Be careful
not to overwrite the original source file because
you may need it later.
 |
Click
to enlarge |
We have discussed how to chop
out a middle segment of a RealMedia file, but
what if you want to append two RealMedia files
that are not from the same source RealMedia file?
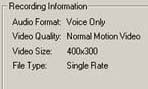
You can do this, but you must ensure that the
RealMedia files are encoded with the same parameters.
For example, you cannot combine a RealMedia file
encoded at 320 x 240 with a RealMedia file encoded
at 400 x 300. The same goes with audio/video codecs,
target audiences, etc. The RealMedia editor will
display an error message if you try to combine
two files with different encoding parameters.
You can view the encoding parameters of each file
by opening the file with RealMedia Editor, then
clicking the “Stream
Info…” button.
Another use we have found for
this method of editing RealMedia files is for
adding an opening “slate” at the beginning
of a RealMedia clip. You must, of course, create
an opening slate video segment, but once you have
one, you can add the slate to any number of RealMedia
files (assuming that they were encoded with the
same parameters).
Well, that is about it for RealMedia
editing. We hope you enjoyed this tutorial and
welcome your feedback.

|